설치 환경
운영체제 : centos 7 3-10.0-1127.13.1.el7.x86_64
DB 버전 : 11.9
구성도

설치 방법
특이사항
- DB 설치 완료 및 기동 상태에서 작업 시작(master만 해당, slave는 설치 후 바로 작업 가능)
- 방화벽은 slave가 master에 접근하여 가져가는 방식이므로 master의 5432를 열어줘야 함
- 기능 분할을 위해 replication 전용의 role을 생성하여 작업(repl)
- 설정파일(postgresql.conf, pg_hba.conf)변경 시 재기동하여야 적용됨(#systemctl restart postgresql-11 혹은 $pg_ctl -D /var/lib/pgsql/11/data restart)
- postgres 설치법은 링크 https://peryh.tistory.com/2 참조하여 설치
master쪽 작업
방화벽 작업
#systemctl stop firewalld => 방화벽 자체를 내리는 방법
#fireall-cmd --permanent --add-port=5432/tcp => 5432 port만 영구적으로 열기
#firewall-cmd --reload
#firewall-cmd --list-ports
selinux 작업
#vi /etc/selinux/config
SELINUX=disabled 로 변경 => SELINUX 자체를 내리는 방법
혹은 아래처럼 옵션 주기
#getsebool -a | grep postgres => postgres 옵션에 해당하는 것만 내리는 방법
#setsebool -P postgresql_can_rsync on
#setsebool -P selinuxuser_postgresql_connect_enabled
postgres계정으로 repl role 생성
#su - postgres
$psql
postgres=# create role repl with replication login password 'repl';
확인
postgres=# \du
나가기
postgres=# \q
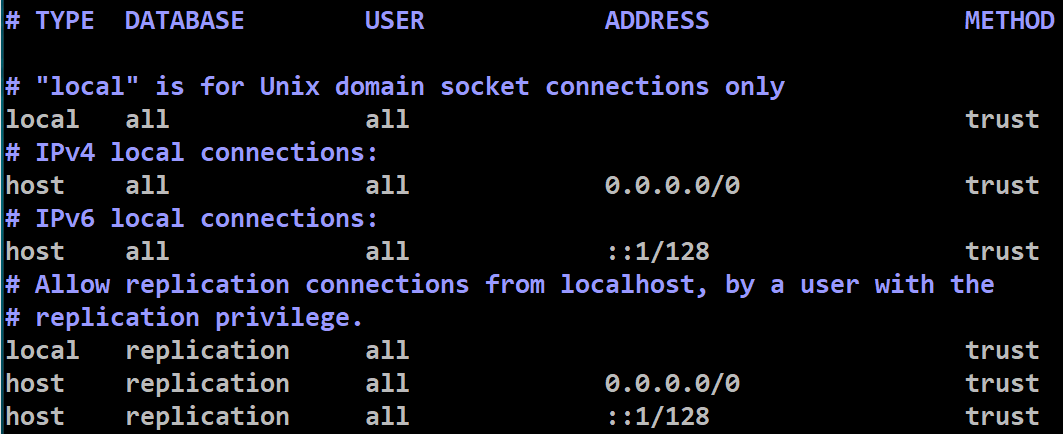
설정파일 변경(ip대역 및 비밀번호 입력이 번거롭다면 아래 처럼 설정, 제한을 하고 싶다면 ip 제한(192.168.0.0/24) 및 Method 설정(md5)하여 사용)
아래 설정 파일은 접속대역 및 연결 방법에 대한 파일
$vi /var/lib/pgsql/11/data/pg_hba.conf
<METHOD 설정 내용>
trust : 무조건 연결 허용, password나 임의의 다른 인증 없이 연결 가능
md5 : 인증을 위해 double-MD5-hashed 패스워드 제공
ident : 클라이언트의 ident 서버에 접촉하여 운영체제 사용자 이름을 획득하고 데이터베이스 사용자 이름과 일치하는지 검증, TCP/IP에서만 사용 가능
peer : 운영체제 이름과 사용자의 이름이 일치하는지 확인, 로컬연결에서만 사용 가능
postgres 설정 전반에 관한 파일
$vi /var/lib/pgsql/11/data/postgresql.conf
#연결 접속 허용 주소와 포트 주석 해제
listen_addresses = '*'
port=5432
#wal_level 설정
wal_level = replica
minimal : 충돌 또는 즉시 셧다운으로부터 복구하기 위해 필요한 정보만 기록
replica : WAL 아카이브에 필요한 로깅과 대기 서버에서 읽기 전용 쿼리에 필요한 정보를 추가
9.6이전버전에는 archive와 hot_standby옵션이 있지만 replica와 동일하게 취급됨
logical : 논리적 디코딩을 지원하는데 필요한 정보를 추가
max_wal_senders = 2
# slave 노드에 WAL 파일을 전송할 때 사용하는 프로세스 개수, WAL sender 역할을 하는 process의 갯수를 의미, slave 개수 + 1 만큼을 설정(ex 현재 구성도에서는 slave가 1개여서 2로 설정, 꼭 최소설정(2개)을 할 필요는 없음)
#wal_keep_segments = 8 # 8-32가 기준
master서버에 보관할 wal파일의 수를 결정하는 항목, default 0, wal파일의 갯수가 32개가 되었을 때, 33번째 파일이 생성되는 것이 아니라, 1번째 WAL부터 다시 overwrite 하게됨, 주석해지 필수 아님
# Replication slot 생성 시(필수 X)
#max_replication_slots = 10
# Archive 사용시
archive_mode = on
archive_command = 'cp %p /home/postgres/PostgreSQL/9.5/archive%f'
#아카이브 저장 경로(폴더는 수동으로 생성)
-- %p is replaced by the path name of the file to archive
-- %f is replaced by only the file name
# Archive 미사용시
archive_mode = off
저장 후 서비스 재시작
#systemctl restart postgresql-11 혹은 $pg_ctl -D /var/lib/pgsql/11/data restart
<슬롯을 사용하는 경우(선택옵션)>
위 작업을 다 한 후, postgresql 접속하여 작업 수행, replication slot 에러 발생하는 경우가 생겨 추천하지 않음
standby 서버가 replication을 따라가지 못하는 경우를 대비하여 wal로그를 replication_slot에 두고 보관함
사용 시, wal_keep_segments 설정이 필요없음
replication slot 생성(master)
postgres=# SELECT * FROM pg_create_physical_replication_slot('repl_slot_01');
slot_name | lsn
--------------+-----
repl_slot_01 |
(1 row)
postgres=# select * from pg_replication_slots;
slot_name | plugin | slot_type | datoid | database | temporary | active | active_pid | xmin | catalog_xmin | restart_lsn | confirme | d_flush_lsn
--------------+--------+-----------+--------+----------+-----------+--------+------------+------+--------------+-------------+---------+------------
repl_slot_01 | | physical | | | f | f | | | | |
(1 row)
replication slot에러나 문제가 생길 시 해당 슬롯 삭제
postgres=# select pg_drop_replication_slot('repl_slot_01');
이후 서비스 재시작
#systemctl restart postgresql-11 혹은 $/usr/pgsql-11/bin/pg_ctl -D /var/lib/pgsql/11/data restart
slave쪽 작업
패키지(rpm -qa | grep postgres)만 설치 후 작업 수행 가능
기존에 사용하던 것이 있다면 DB종료 후 옮기고 작업 시작
#systemctl stop postgresql-11
#su - postgres
$cd /var/lib/pgsq/11/
$mv data data_old
시스템 계정으로 설치 후 지우고 OS postgres계정을 만들었다면 mv 명령 시 허가거부가 발생할 수 있음
이런 경우 /var/lib/pgsql의 소유자 권한을 확인 후 변경
#chown -R postgres:postgres /var/lib/pgsql
master의 DB 정보를 복사해 옴(master ip를 입력)
$ /usr/pgsql-11/bin/pg_basebackup -h <master OS ip> -D /var/lib/pgsql/11/data -U repl -v -P -X stream
-D : 받아올 master OS의 postgres data경로
-v : 부가적 정보를 표시
-P : 전송 진행 상황을 표기
-X : WAL도 같이 backup하라는 옵션
-stream : 백업이 생성되는 동안 트랜잭션 로그도 같이 함, 이렇게 하면 서버에 대한 두번째 연결이 열리고 백업을 실행하는 동안 트랜잭션 로그 스트리밍이 병렬로 시작됨, 따라서 max_wal_sender 매개 변수로 구성된 두 개의 연결을 사용하게 됨
-fetch 방식은 트랜잭션 로그 파일은 백업이 끝날 때 수집되며, wal_keep_segment 매개 변수를 높게 설정하여 백업이 끝나기 전에 로그가 제거되지 않음
비밀번호 입력
repl -->trust라면 입력 안하고 복사 되어옴
slave 노드가 hot_standby 역할을 하도록 설정
vi /var/lib/pgsql/11/data/postgresql.conf
# 해당 부분의 주석 해제 및 변경
hot_standby = on
hot_standby_feedback = on
해당 DB가 slave임을 알려주는 파일 생성, 생성 안되어 있으면 wal process가 뜨지 않음
slave 노드가 master 노드로 바뀌어야 할 때(failover)를 위한 설정이기도 함
vi /var/lib/pgsql/11/data/recovery.conf
# standby mode 적용
standby_mode='on'
# master 노드의 정보 기입
primary_conninfo='host=<master OS ip> port=5432 user=repl password=repl'
# 슬롯 사용 시 적용
primary_slot_name='repl_slot_01'
# slave노드에 trigger file이 있으면, slave가 master로 전환된다.
trigger_file='/var/lib/pgsql/11/data/failover_trigger'
# Archive 사용시
restore_command = 'cp /home/postgres/PostgreSQL/9.5/archive%f %p'
primary_slot_name = 'stnby1'
slave DB를 기동한다.
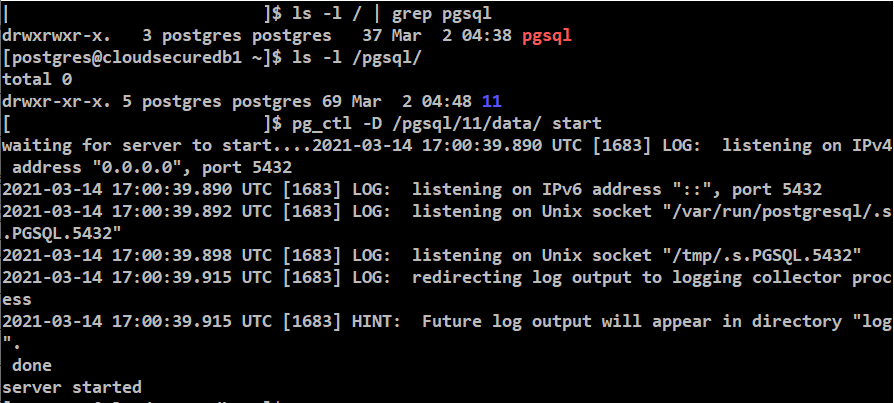
$/usr/pgsql-11/bin/pg_ctl -D /var/lib/pgsql/11/data start
master에서 walsender가 뜨지 않으면 /var/lib/pgsql/11/data/log 디렉터리에서 내용 확인
아래같은 로그 발생 시

openssl-libs RPM의 일부인 잘못된 버전의 libcrypto.so가 설치되어 있다는 것을 의미
www.postgresql.org/message-id/7748ff129ea2966e1943ba41f0a6a1f1702edb05.camel%40cybertec.at
따라서, openssl을 설치해 주시면 정상적으로 동작(삭제 안해도 가능)
#yum -y install openssl
이후 다시 기동
$/usr/pgsql-11/bin/pg_ctl -D /var/lib/pgsql/11/data start
양쪽에서 확인
wal 관련 process 떠있는지 확인
$ps -ef | grep wal
DB내에서 master인지 확인, recovery모드가 f(false)여야 master
postgres=# select pg_is_in_recovery();
slave DB를 수동으로 master로 전환하고 싶다면
$/usr/pgsql-11/bin/pg_ctl promote -D /var/lib/pgsql/11/data/
'데이터베이스 > postgres' 카테고리의 다른 글
| Postgres pgpool-II을 이용한 failover (0) | 2021.03.24 |
|---|---|
| Postgres 기본 경로 변경 (0) | 2021.03.15 |
| Postgres 설치 및 사용 방법 (0) | 2021.01.14 |